 |
| Picture by Ondrej Supitar / unsplash.com |
Using SSL/TLS to secure your webservers has always been a good idea, not only since three letter agencies are eavesdropping on everybody’s Internet communication. Preventing hacking and information lost is also on the IT-Professionals to-do list for a very long time.
Which certificate do we use
There are a few ways to get a new certificate for the Internet Information Server, but all in all in breaks down to the simple question: Do I need a trusted certificate or not.
If you plan to publish your site to the web I’d suggest you get yourself a trusted certificate from a certificate authority. There are a lot of different certification companies out there and all of them are happy to take your money.
If you plan to stay in a local network, you could consider using your own Public Key Infrastructure (PKI). But this however might be shooting a little too high. Especially if you only have a few servers to secure and no other plans to use the PKI.
This post is


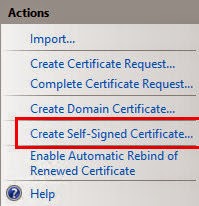
When you open the settings for the Server Certificates you’ll find on the right handed site in the Actions menu. There is an entry to create a new self-signed certificate.
Wait a minute
The IIS wizard comes in quite handy but doesn’t let me choose the hostheader name for the certificate. Instead it uses the server’s hostname. Nope, that's not what I wanted. But how do we create the certificate then?
PowerShell to the rescue
Open a new PowerShell and enter the following command:
New-SelfSignedCertificate -CertStoreLocation Cert:\LocalMachine\My -DnsName <URI>This will create a new certificate in the certification storage on the local server. If you have more than one server, don’t forget to export the certificate and import it to the other servers.
To open the certificate storage go to the Windows start menu and type “cert” on the keyboard. You should see the Manage computer certificates console in the search then.

Move your certificate you created from the personal storage to the Web Hosting folder.

You can evaluate the parameter of your certificate now. If you made a mistake somewhere, simply delete the certificate and start over again.
One certificate to bind them all
Now that the certificate is in place, we can start binding the certificate to the web application. To do so, use the IIS Manager. Select the web application you what to configure and choose bindings from the Actions menu.
A small window opens. Select Add… and configure a new site binding. Use https as protocol type, enter the host name of your site and select the SSL certificate from the drop-down. Select OK then.

You should then have a new entry in the list that looks like this. Close the window to finish the configuration of the IIS.
The PowerShell ..... again
If you are using Hostnamed Site collection you need to add a new Url to the Site collection. Go back to your PowerShell and type the following command:
Set-SPSiteURL (Get-SPSite http://) -Url https:// -Zone Extranet

That's it. You should now be able to open your site vie SSL/TLS.

Part 2 can be found here. There I will show you how to configure the IIS to redirect automatically to https. Until then, subscribe me on Twitter to stay updated and leave me a comment in the section below. Don't forget to share this article with your followers via Twitter and Facebook